[en] How To Format Text
[en] It is very easy to format text for a presenter. Autocue software includes all the tools you will be familiar with in word processors.
[en] You can simply and quickly change the font type, font size, colour, text alignment and other parameters to get the text looking how you want.
[en] Text Toolbar

[en] The text formatting can be changed using the Text Toolbar. This is at the top of the screen above the Story Editor pane.
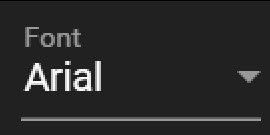 |
[en] Font: Use the font button to change the font type of the selected text.
[en] Click the pull-down arrow to see a list of the available fonts.
[en] Click on some text to see what font is already applied.
 |
[en] Font Size: Use the text size button to change the font size of the text
[en] Click on the pull-down arrow to see a list of the predefined text sizes.
[en] If you want to use a different size do not click the pull-down. Select the text then click on the number under the word Size and type over with the new value.
[en] Click enter or click out of the box to apply the new size.
 |
[en] Foreground colour: use the Foreground button to change the colour of the text.
[en] Click on the pull-down arrow to see a list of the predefined colours.
[en] The letter A will always show in white, the line below will show the last selected colour.
 |
[en] Swap: when text is selected, pressing this will swap the foreground and background colours.
 |
[en] Background colour: use the Background button to change the colour of the text.
[en] Click on the pull-down arrow to see a list of the predefined colours.
[en] The paint-pot icon will always show in white, the line below will show the last selected colour.
 |
[en] Bold & Italic: use the Bold button to toggle bolding of the selected text
[en] Use the Italics button to toggle italicizing the selected text
 |
[en] Underline: use the Underline button to change the colour of the underline.
[en] Click on the pull-down arrow to see a list of the predefined colours.
[en] The letter U will always show in white, the line below will show the last selected colour.
 |
[en] Force Upper Case: click on this button to toggle the selected lower case text from lower to upper case.
[en] Text which is already upper case will be unchanged.
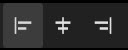 |
[en] Text Justification: select your text and then use these buttons to left justify, centre, or right justify the selection.
 |
[en] Bullet points: use this button to apply bullet points to the start of a line.
[en] To apply bullet points to multiple lines select the lines you want and then click the bullet point button.
[en] Use the pull down arrow to select different styles of bullet point: line, point or blank (shown as indented):

[en] To remove an individual bullet point click the bullet point in the script and then click the bullet point button again.
 |
[en] Indentation: you can select how indented you would like the bullet pointed text to be.
[en] Click the left button to increase the indent.
[en] Click the right button to decrease the indent.