Operating the monitor
Functions of the buttons
01 | ON/OFF | On/Off |
02 | – |
|
03 | + |
|
04 | MENU |
|
05 | AUTO |
|
06 | LED |
|
 |
Main menu
To navigate through the menu, use the up and down buttons on the side or back of the monitor. These allow you to move up, down left or right, respectively. To confirm or to enter a specific setting use the "AUTO" button on the back of the monitor.
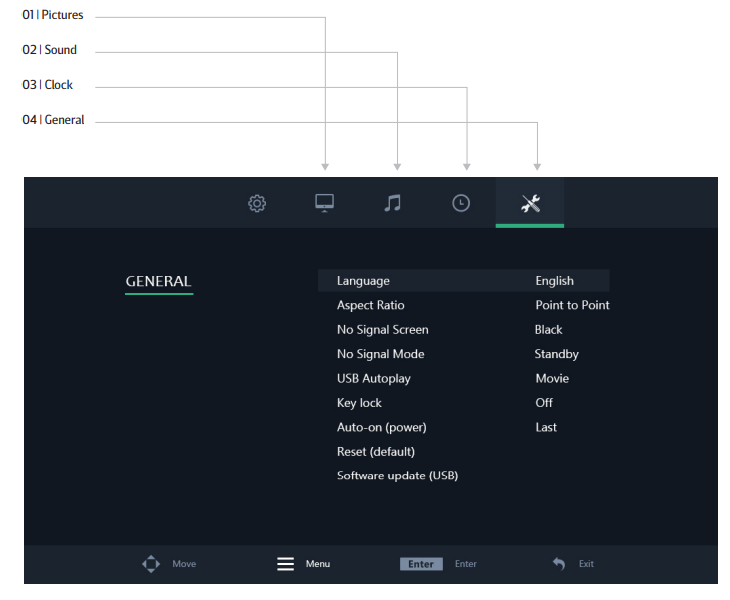
Press the ''MENU" button on the monitor to access the main menu. The menu consists of 4 categories spread over 4 tabs:
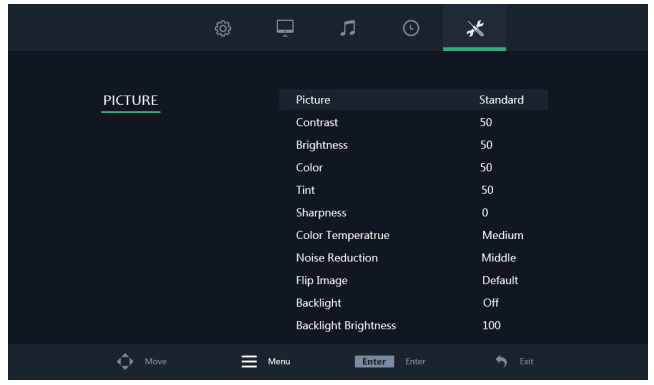
Picture settings
Picture
Select your preferred picture mode. Select the ''User'' preset to manually adjust each value.
Contrast Adjust picture contrast.
This value can only be changed if the picture mode has been set to "User".
Brightness Adjust picture brightness.
This value can only be changed if the picture mode has been set to "User".
Colour Adjust picture colour intensity.
This value can only be changed if the picture mode has been set to "User".
Tint Adjust picture tint
This value can only be changed if the picture mode has been set to "User".
Sharpness
Makes the image look sharper or softer. This value could only be changed if the picture mode has been set to "User".
Colour temperature
Adjust the colour temperature. A low setting will decrease the colour temperature. The screen appears cooler with a blue tint. A high setting will increase the colour temperature. The screen appears warmer with a red/yellow tint.
Noise reduction
Adjust noise reduction level.
Flip image
Select your preferred flip mode. Available options are: Horizontal, Vertical and Vertical + Horizontal
Backlight
Select how the backlight brightness is adjusted.
Backlight brightness
Adjust the backlight brightness from 1-100.
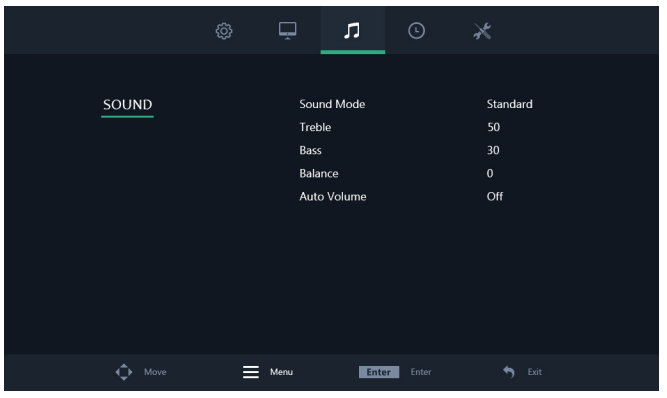
Sound settings
Sound Mode
Select your preferred sound mode. Select the ''User'' preset to manually adjust each value
Treble
Treble function stresses high tones providing sharp sound effects. This value can only be changed if the sound mode has been set to "User".
Bass
Bass function stresses low tones providing thudding sound effects. This value can only be changed if the sound mode has been set to "User".
Balance
Emphasizes sound from the left or right speaker.
Auto Volume
Turn on/off auto volume.
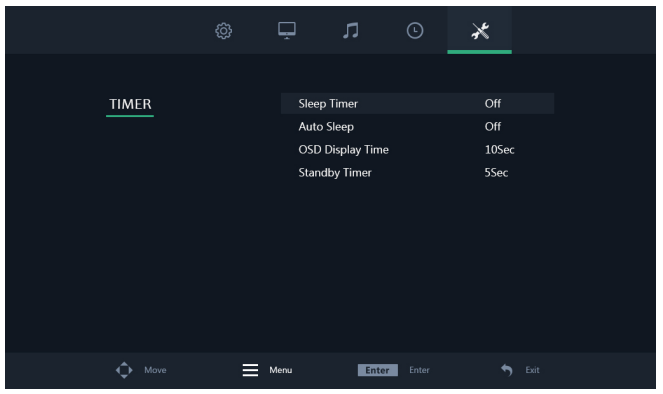
Timer settings
Sleep timer
Set the time the monitor will shut itself off (after a restart this setting will not be saved).
Auto sleep
Set the time the monitor will shut itself off (settings will be saved a restart).
OSD display time
Set the time the OSD menu will be visible before disappearing.
Standby timer
Choose the amount of time needed to pass for the monitor to go into standby mode
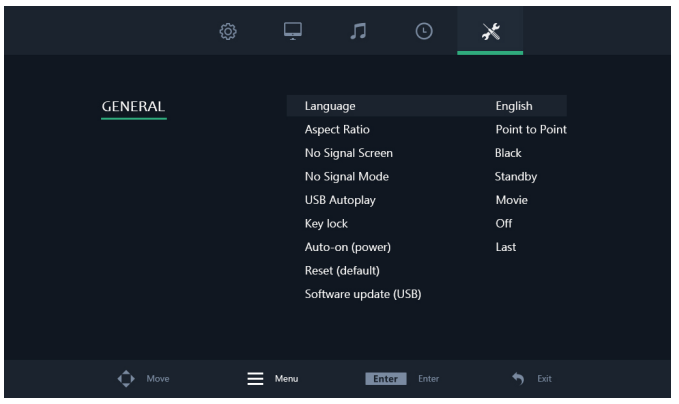
General settings
Language
Defines the language of the menu. The default setting is English (US).
Aspect ratio
Set the relationship between the width and height of the picture shown on the monitor.
No signal screen
Choose a blue or black “no signal” screen.
No signal mode
Select whether the monitor turns off, shows a black screen or shows NO SIGNAL when not receiving a signal.
USB autoplay
Select what type of USB file will be autoplayed when the monitor receives current.
Key lock
Turn on/off the key lock. When turned on all buttons on the monitor are blocked. The remote is needed to deactivate this feature.
Auto-on (power)
Turn on/off the auto-on (power). When this setting is activated the monitor will turn on automatically when it receives power.
Reset (default)
Reset to the default/factory settings.
Software-update (USB)
Update the firmware. A USB with valid firmware must be connected. A Yes/No window will be prompted.
Mounting options
All of our monitors are ready to be fitted with a 100mm VESA mount thanks to the four M4 screw points found on the back of all our monitors.