Monitor Configuration
 Warning Risk of electric shock. Always disconnect and isolate the product from the power supply before attempting any servicing or removing the covers. Only authorised technicians are permitted to service the display.
 Warning DO NOT use if panel has been exposed to water ingress, the panel has been dropped or the enclosure is damaged. Refers to authorised service personnel.
Caution Personal Injury. Equipment Damage: Do not place any objects on the cables. Route all cables such that they do not present a stumbling hazard.
The monitor digital control functions are located on the top side of panel. They are shown in the figure below and described in the following paragraphs.
 |
Function Select
Press the “MENU” knob to show the OSD menu. Then use the △ and ▽ knobs to select a function. Press the “AUTO” knob to close the OSD menu.
You can hold the “AUTO” knob for more than 3 second to adjust the image quality automatically.
The OSD menu will close automatically after 3-10 seconds without operation and saves any changes you have made.
Press the “AUTO” knob to directly to switch video source.
Function Adjustment
Video
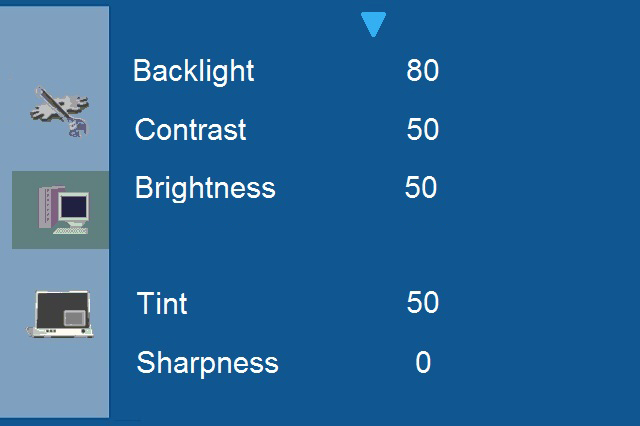
Backlight Adjust the backlight level.
Contrast Adjust the difference in luminance between light and dark areas of the image.
Brightness Adjust the luminance level of the image.
Tint Adjust the hue level of the image.
Sharpness Adjust the Sharpness level of the image Cool (9300k) / User / Warm (6500k) / Nature (7500k).
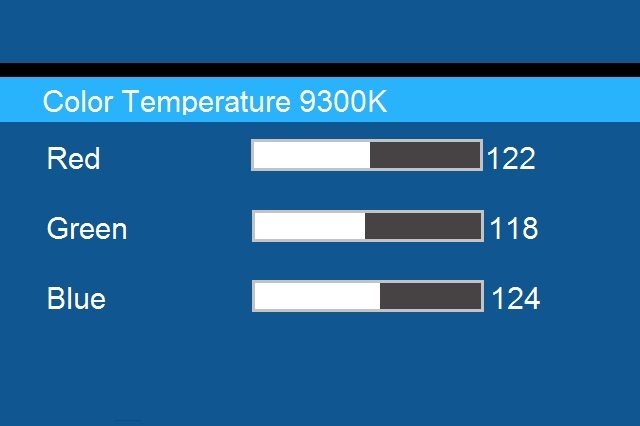
VGA

Backlight Adjust the backlight level.
Contrast Adjust the difference in luminance between light and dark areas of the image.
Brightness Adjust the luminance level of the image.
Colour Temperature Adjust Colour Temperature Cool (9300k) / User / Warm (6500k) / Nature (7500k).
Display (Video)
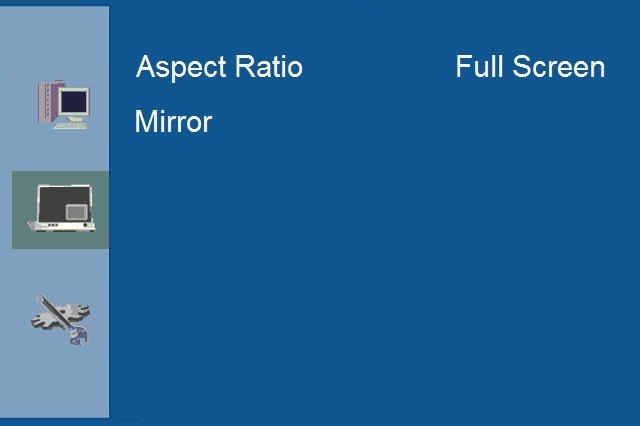
Aspect Ratio Adjust Aspect Ratio Full Screen/1:1/4:3/16:9.
Mirror Adjust Mirror function.
UD On/Off: Switch On/Off vertical mirror function LR On/Off: Switch On/Off horizontal mirror function.
Display VGA
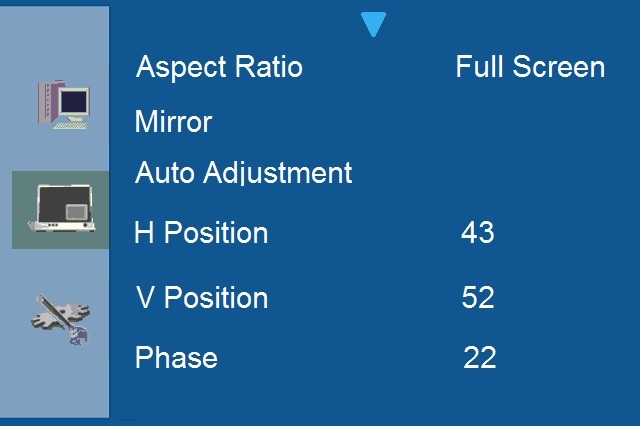
Aspect Ratio Adjust Aspect Ratio
Full Screen/1:1/4:3/16:9
Mirror Adjust Mirror function.
UD On/Off: Switch On/Off vertical mirror function LR On/Off: Switch On/Off horizontal mirror function.
Auto Adjustment Adjust geometry of the image automatically. H Position - Adjust the horizontal position of the image.
V Position Adjust the vertical position of the image. Phase - Adjust the horizontal sync phase of signal.

Clock Adjust the horizontal sync size of signal.
System Settings
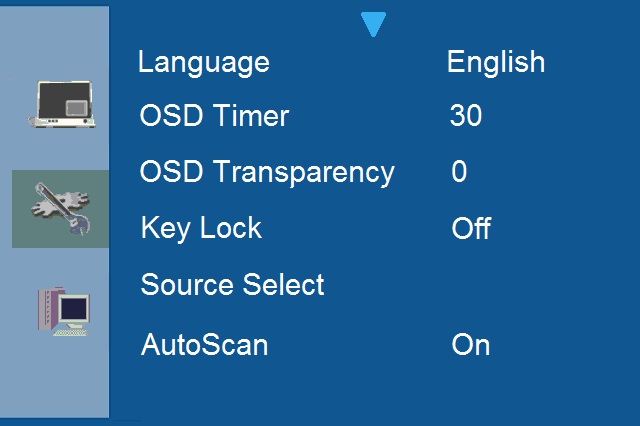
Language Select Language English/Trad. Chinese / Fran / Deu / Ita.
OSD Timer Adjust OSD Timer.
OSD Transparency Adjust OSD Transparency.
Key Lock - Set key lock function on/off.
(Unlock under OSD: Press menu key to call keylock message, then press key by following sequence: Up → Down → Up → Down → Menu).
Source Select Switch between following source: VGA / HDMI / SDI / CVBS

AutoScan Switch On / Off to auto detect video source.
Recall Resets Monitor to Default, all User Saved Settings Will be Lost.

Micro-controller Features
The micro-controller automatically detects the video board installed in your system. When you turn on the monitor, the micro-controller first checks the display mode memory stored in the user setting area of the video board, and then the factory presetting area. It then adjusts to the proper display mode.
Display Modes Memory
The micro-controller has the memory capacity to store different display modes, including timing formats and display-settings.
Factory Pre-set Area
There are some preferred display modes pre-set in the micro-controller. These display modes are pre-set at the factory and include the most popular display modes currently available. The micro-controller searches for a proper display mode in this area if it fails to find a proper display mode in the user setting area.